Automotive windshields are crucial parts of a vehicle. It provides clear visibility for the driver. It also protects the potential obstacles and ensures safe navigation. However, a properly functioning windshield rubber seal ensures an air-tight seal and the safety of the passengers. It prevents water, dust, and debris from seeping into the car’s interior. A well-maintained rubber seal reduces wind noise and enhances the overall driving experience. Here comes the necessity of windshield rubber seal replacement.
Over time, a rubber car window seal can wear out. It becomes damaged due to various factors like exposure to harsh weather conditions or accidental impacts. When we ignore the signs of deterioration, compromised windshield stability appears. It finally poses potential safety hazards on the road. Ultimately, it leads to costly repairs. Follow these step-by-step instructions on windshield rubber seal replacement before any threats appear.
This article highlights the importance of maintaining a functional car windscreen rubber seal. It explores the common signs that indicate the need for a windshield rubber seal replacement. The article also guides readers through the step-by-step process of replacing the seal correctly. We hope this article helps car owners ensure their windshields remain securely sealed and leak-free. Drivers can also provide their passengers with a safe and comfortable driving experience.
Understanding Windshields And Their Function
A car windshield is also famous as a car windscreen. It is a large glass panel located at the front and rear of a vehicle. It is a protective barrier between the occupants of the car and the external environment while driving. The primary purpose of this windshield is to provide clear visibility for the driver. In addition, it allows them to see the road and obstacles ahead. Above all, it contributes to the overall safety of navigation.
Car windshields are typically made of laminated safety glass. Laminated glass comprises two glass layers sandwiched with a PVB layer. PVB stands for polyvinyl butyral. It acts as a bonding agent and holds the glass layers firmly. Besides, using laminated safety glass in car windshields enhances overall vehicle safety. It protects from external elements and supports the car’s structural integrity.
A damaged rubber seal creates various issues that compromise the windshield’s integrity. It lets water, dust, and air seep into the car. It makes potential leaks and interior damage. In addition, gaps or improper seals can reduce the windshield’s stability. It creates vibrations and weakens the glass, which can be dislodged during sudden impacts or harsh driving conditions.
Recognizing The Need For Windshield Rubber Seal Replacement
We know that a windshield rubber seal ensures the structural integrity of your car’s windshield. It also protects passengers against external elements. It maintains a quiet and comfortable cabin environment. Over time, this vital component may experience wear and tear. As a result, you may require windshield rubber seal replacement to prevent further issues. If you face the following four signs, replace the windshield rubber trim ASAP.
- Visible damage and wear: Cracks, splits, and a brittle or discolored appearance are clear indicators. If you observe these situations, you can ensure your front windshield seal is no longer functioning correctly.
- Water leakage and air noise: If you notice water seeping into the interior, the rubber seal may be compromised. Besides, if you experience whistling sounds at high speeds, replace your car window seal ASAP. Water leakage and air noise jeopardize your vehicle’s interior and compromise driving comfort.
- Windshield misalignment: Uneven gaps between the windshield and the car frame can signal a faulty rubber seal. If you observe such a problem, take immediate action.
- Extreme wind noise: Excessive wind noise reduces driving comfort. It also indicates that the seal cannot protect the cabin from external elements.
Windshield Rubber Seal Replacement
This section highlights the step-by-step process of replacing the car windshield rubber seal. From preparation to installation, we will cover everything you need to know to ensure a successful replacement. In addition, we’ll provide you with valuable tips to tackle any challenges that may arise during the process.
Step 1: Preparing For Windshield Rubber Seal Replacement
We should be prepared for the replacement process to ensure we have the required tools. You are taking the time for preparation to ensure your safety and the project’s successful outcome. Safety should always be the top priority when working on any automotive project. Wear safety gear like gloves and safety goggles to protect yourself from hazards. Park your car in a well-lit and level area. In addition, engage the parking brake during the car windscreen seal replacement. This step is necessary to prevent any unexpected vehicle movement.
Secondly, the right tools are essential for a seamless windshield rubber seal replacement. Prepare standard tools like a rubber mallet, seal removal tool, lubricant or adhesive, and a utility knife. In addition, gather the replacement rubber seal specific to your car’s make and model to ensure a precise fit. Thirdly, selecting the right windshield rubber seal is vital for proper fit and functionality. Double-check your vehicle’s specifications. Now, compare them with the new seal to ensure they match the dimensions and design of the original seal.
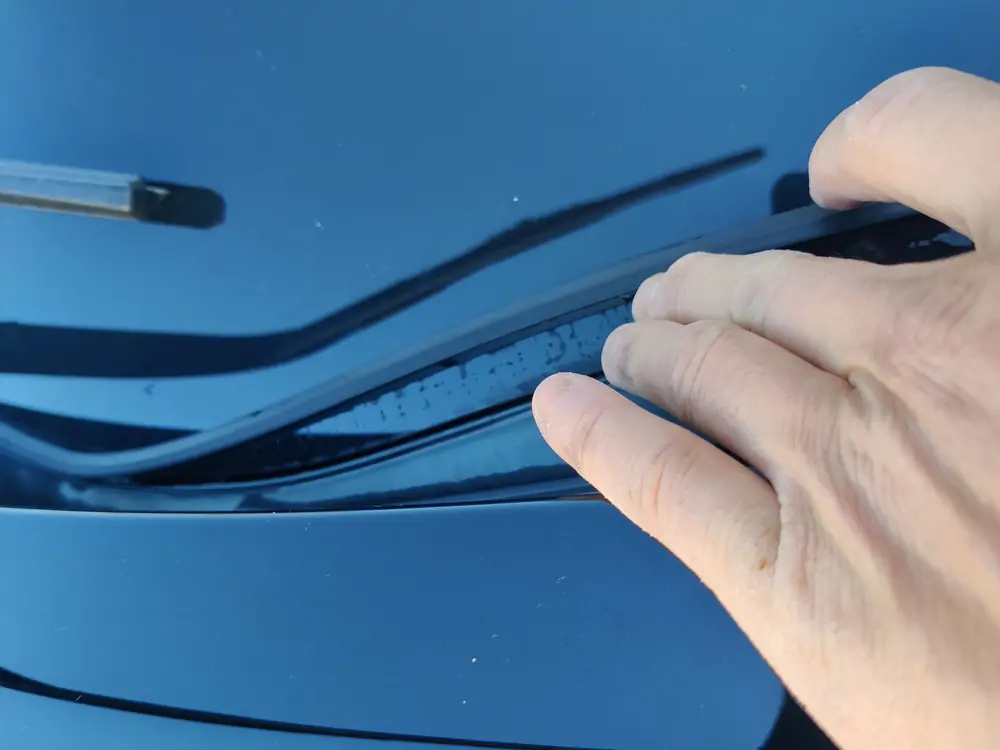
Step 2: Removing The Old Rubber Seal
After the preparation, it’s time to remove the old rubber seal. This process requires precision and care to avoid damaging the windshield or the surrounding frame. Firstly, park the car in a suitable location. Choose a location with ample space and protection from harsh environments. In this case, you can select a garage or covered area. These places shield you from weather conditions and provide a stable working environment.
Secondly, soften the rubber seal if necessary. If the old rubber strip is difficult to remove, soften it with a heat gun or hot water. Gently apply the heat to the seal, making it more pliable for easier removal. Thirdly, use the appropriate tool to remove the old seal carefully. Take your time and work methodically, and ensure you don’t damage the glass or vehicle structure. Finally, clean and inspect the windshield frame. Remove any remnants of the old seal and debris, and check the framing for any signs of damage or corrosion. In addition, address any issues before proceeding with the installation of the new rubber seal.
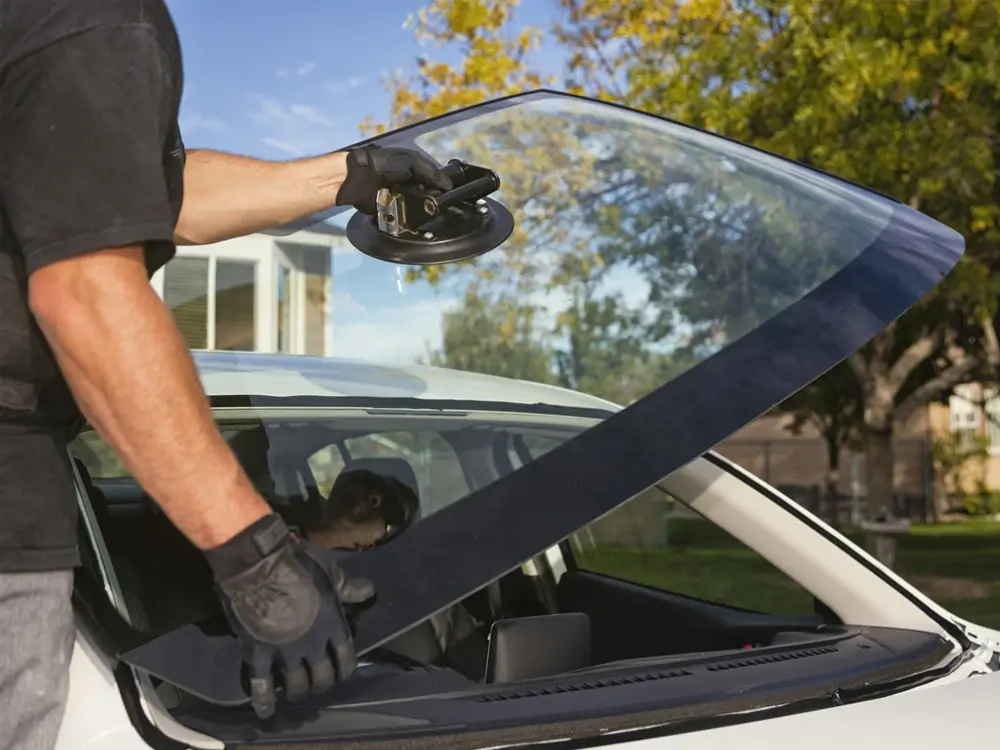
Step 3: Installing The New Rubber Seal
Once you have removed the old rubber seal from the windshield, it’s time to install the new one. This step is critical for ensuring a watertight and secure seal. Firstly, prepare the new rubber seal for installation. In this case, carefully inspect the new rubber seal for any defects or damage before proceeding. It is essential to compare the new rubber seal with the old rubber seal. Ensure it matches the specifications of your car’s make and model.
Secondly, some windshield rubber seals may need a lubricant to facilitate installation. In this case, you must follow the manufacturer’s recommendations and apply the appropriate amount. Proper lubrication ensures an adequate bond between the seal and the windshield frame. After that, install the new windshield seal from one end of the frame. Here, carefully align it to fit without any gaps or misalignment. Once the windshield rubber seal is in position, apply gentle pressure along its length. It ensures that the seal adheres firmly to the windshield frame. You can also use a rubber mallet or a soft hammer to tap the seal into place if needed.
Step 4: Post-Installation Checks
After successfully installing the new windshield rubber seal, conduct post-installation checks. This step is necessary to ensure the effectiveness of the replacement. Besides, post-installation inspections will also help you address any potential issues. Firstly, carefully inspect the seal to ensure it is evenly aligned and fits seamlessly around the entire frame.
Secondly, examine the seal and windshield frame for visible gaps or irregularities. It is important to note that faulty gaps could allow water, air, or debris to penetrate the interior. Ultimately, it creates leaks or increased wind noise while driving. Finally, ensure a watertight seal. In this case, gently spray water around the windshield and pay close attention to the windscreen rubber seal. If water seeps into the cabin, you can ensure a faulty seal installation. If you observe such a situation, take immediate action.
Step 5: Additional Tips And Troubleshooting
During the replacement process, certain situations may arise that require special attention. Here are some additional tips and troubleshooting advice. You can ensure a successful seal replacement by navigating through potential challenges.
- Dealing misaligned rubber seals: If the new windshield rubber seal is difficult to position, apply gentle heat with a heat gun. It makes them flexible and easier to work with. We recommend avoiding excessive force, which may damage the seal or the windshield frame.
- Proper maintenance: Regular maintenance maximizes the lifespan of the newly installed rubber seal. Clean the seal periodically with mild soap and water to prevent dirt buildup. In addition, do not use harsh chemicals that might deteriorate the rubber.
- Common mistakes to avoid: Be cautious when using sharp tools during removal. It is important to note that sharp tools can inadvertently scratch or damage the windshield. In addition, ensure the frame is completely clean and debris-free before installing the new seal. Above all, follow the manufacturer’s instructions and the steps in this guide.
Conclusion
Regular maintenance of car windshield rubber seals is essential to ensure optimal performance. Proper care preserves the overall integrity of the windshield. You can prevent potential leaks and avoid costly repairs by promptly identifying signs of wear or damage.
Throughout this replacement guide, we’ve covered the step-by-step process, from preparation to installation. We have emphasized the significance of safety and precision. By following these instructions diligently, you can successfully replace the rubber seal. In addition, you can safeguard your vehicle against water leaks, wind noise, and other adverse effects.